Monday, March 31, 2014

Blue Dog - 4/1/14

Our next project will be inspired by Cajun artist George Rodrigue and his famous "Blue Dog".  Mr Rodrigue was born in Lousiana in 1944.  He studied art and went on to paint Louisiana landscapes depicting moss clad oak trees native to the area known as French Louisiana.  He became famous in the 1990s when he painted Blue Dog based on a Cajun legend.  The dog's shape and stance was modeled after Rodrigue's deceased dog Tiffany.

Rodrigue wrote on Blue Dog "The yellow eyes are really the soul of the dog. He has this piercing stare.  People say the dog keeps talking to them with the eyes, always saying something different. People who have seen a Blue Dog painting always remember it. They are really about life, about mankind searching for answers. The dog never changes position.  He just stares at you. And you are looking at him, looking for some answers, "Why are we here?" and he's just looking back at you, wondering the same. The dog doesn't know. You can see this longing in his eyes, this longing for love, answers."
Not all dogs are blue.  Oak trees are common in his work.

We will look at Rodrigue's work.  We will be sketching out our version of "Blue Dog".  Either a close up or...
a full body version. 
We will be using tempera paints for this project.
A fun background can be added.

Monday, March 17, 2014

Op Art - 3/18

We will be basing our project this week on an art movement popular in the 1960s called Optical Art or Op Art.  Op Art gives the illusion of movement.  It is meant to trick the eye.  It is a precise and mathematically based composition.  While the movement became popular around 1965-1969, the very first op art appeared in 1938 in a composition from Victor Vasarely entitled "Zebra".  It was not well received at that time, but Vasarely continued to produce work in the op art style.  A very popular op art artist is Bridget Riley.  Born in 1931 in London, Riley continued in popularity up until present day.

For this project we will be using straight and curved lines and color to create our op art.  We also talk about adding value to the piece.

Curved lines are added.
We will color one section at a time.  Here is the first color.  Then the next set of curved lines are added.
The top half of the piece has some value added in the form of a highlight.  This helps increase the movement on the finished piece.  This example is done in crayons.
Here is an example in colored pencil.  Students can choose what medium they want to work in.

Monday, March 10, 2014

3/11 or 3/25 Radial Name Design

Our next project is one that I like because it is packed with art theory! We will cover: radial, symmetry, pattern, line, color, perspective. Wow - but it will be fun!

We will be creating a radial design using our names.  Radial is done in the round. We will work on symmetry - balancing both sides of the design.  Students will start with a swirl of eight curved lines.

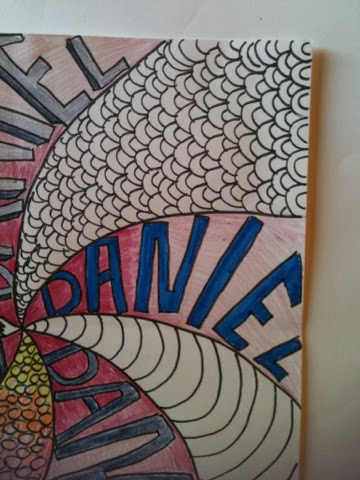
They can chose to either use their name or an inspirational word.  I used my oldest son's name for the example.  We will work on block lettering.
Patterns will be added to the spaces without letters.  Students can try adding value to the name sections or just color solid.  The pattern sections will also get color.  Maybe some color theory will be applied here (warm, cool, secondary, primary).
Students can also create a 3D effect to their block letters - like we just did on our cityscape.
Or color them in solid.  This section of name is colored in with markers, the other name sections in color pencils. I show both options, but we will pick one medium for all the letters.  The kids can use markers, color pencils or crayons for this project.